Many direct mail campaigns are driven from lists that are stored in .CSV files or Microsoft® Excel files.
eduPostal has a process that makes it easy to: a.) import mailing lists with Excel or CSV files and b.) map them to become eduPostal lists. Once a list has been imported, it can be re-used across multiple campaigns
Table of contents
- How Should I Prep My File?
- How To Import Your .CSV Or Excel File
- Check Out Your Imported List
- Learn More About eduPostal
How Should I Prep My File?
There are some important things to understand prior to importing your file into eduPostal.
US and Canadian Addresses
eduPostal allows you to upload a single list with both US and Canadian addresses and we’ll split it out for you, creating two separate lists, to be used in Smart Send Campaigns. You’ll want to be sure to include a field labeled Country, along with the other required fields explained below.
eduPostal Required Fields
When you import an Excel or .CSV list into eduPostal, we’ll check each record to make sure that it has the minimum required fields for proper mailing. If a contact does not have the required fields, we’ll import it anyway, but it will be labeled “Invalid” and cannot be mailed to until it is fixed.
Required Name Fields
- First Name (20 characters, alpha numeric) and Last Name (20 characters, alpha numeric) AND/OR
- Company (40 characters, alpha numeric)
You may have either First Name and Last Name or Company Name or both. They will be printed on two separate lines above the rest of the address and will look something like this:

Required Address Fields – US and Canada
- Address (64 characters, alpha numeric)
- City (200 characters, alpha numeric)
- State/Providence (for US addresses either the 2 letter state short-name code “MA” or valid full state name “Massachusetts”)
- Zip code/Postal Code (for US addresses either the 5 digit numeric “02370” or 5 dash 4 digit numeric “02370-1234”), (for Canadian addresses the 6 digit alpha numeric “K0K 4T5”)
You may also include an Address 2 field on records that require it (64 characters, alpha numeric). Use this field for things such as apartment number, suite number, etc.
Personalization And Other Common Fields
You can also map in common contact info such as email address, phone number, occupation/job title as well as up to 35 user defined fields (we call them Variable Data fields). These fields are not used in the address part of the mailer but can easily be inserted into the creative.
At the current time, eduPostal can only mail to U.S. addresses. Additional countries will be added over time.
File Format
The file you upload needs to be a .CSV (comma delimited) file or a Microsoft® Excel file. When formatting your file, the following is VERY IMPORTANT:
- All data should be contained in one sheet
- All columns must have a “header” or title in the first row. Headers should be alpha/numeric – no spaces, no blank columns (delete them!)
- No hidden columns or rows – here’s how to delete them: https://www.extendoffice.com/documents/excel/857-excel-delete-hidden-rows-columns.html
- Do not use special characters – letters and numbers only
- Do not “Wrap Text” – make sure Wrap Text is unchecked for the entire sheet
- All data should be in text format – without formulas or formatting. Here’s how to clear formatting or comments: https://www.extendoffice.com/documents/excel/1148-excel-clear-all-formatting.html
How To Import Your .CSV Or Excel File
The eduPostal importing software is designed to deal with the most common problems we’ve seen in the thousands of spreadsheets that have been used to import data into eduPostal .
- It fixes zip codes that are missing “leading zeros”
- It throws out many file format issues like formatting, special characters and empty columns (but not all – clean up your file first!)
- You can download a sample data file to see how a good file is structured
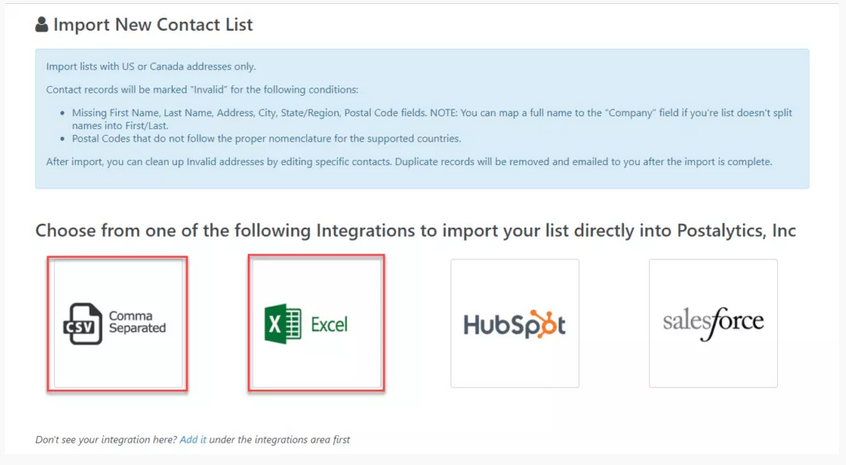
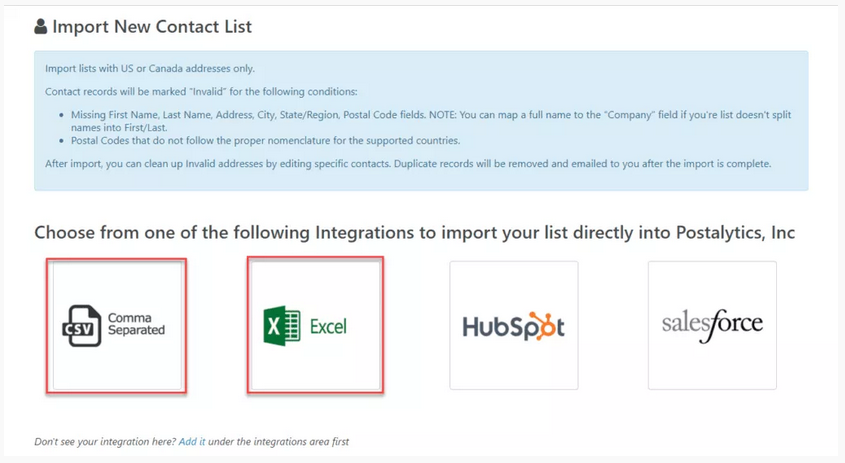
First – Select .CSV or Excel From The New List Options
Next – Name The List And Choose The File
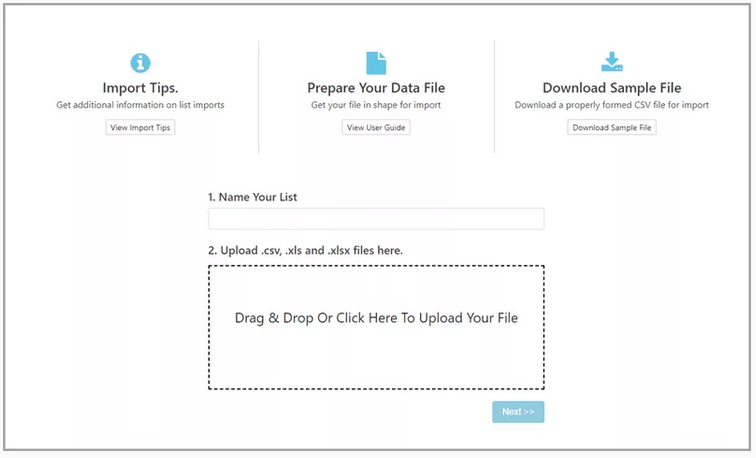
These steps are pretty self explanatory. We do recommend that new users review the help articles and the sample data file. Setting your file up properly will save you a lot of time later!
Then – We Show You Your Raw Data
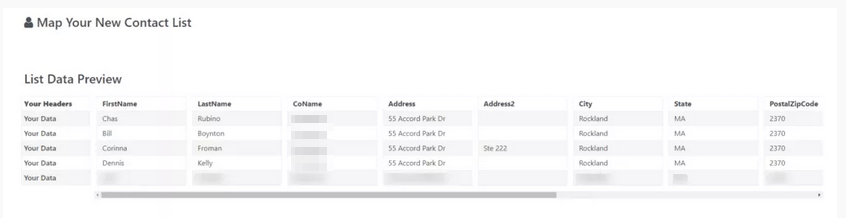
The “List Preview Data” will show you what your data looks like before the importer gets a hold of it. Here, if you see any egregious issues (I forgot to add a City column!), you can go back and fix your data file before you spend more time on the import.
To continue, click Looks Good! Start Mapping.
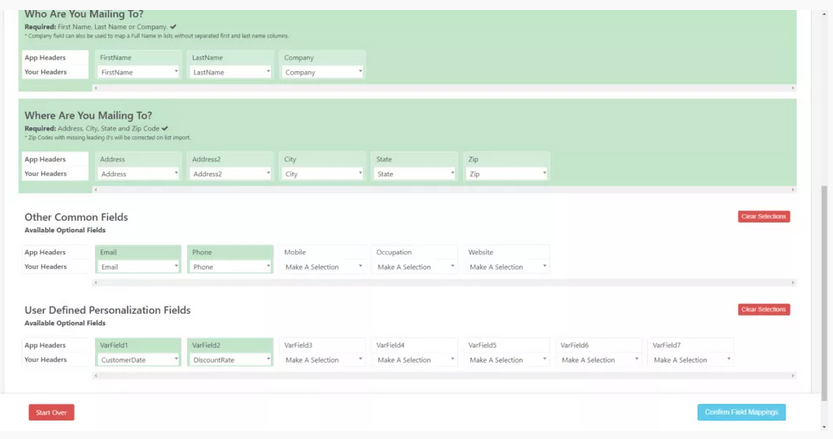
Now – Map Your Fields
eduPostal Auto Mapping
The eduPostal mapping tool will recognize and automatically map any column headers that are an exact match to the standard Contact Record fields, such as First Name, Last Name, Company, Address, Email, etc. Any extra columns in your data file that are not recognized will be mapped as Variable Data fields in the “User Defined Personalization Field” section.
If you’ll be repeatedly importing .CSV or Excel files with the exact same columns, we recommend editing your column headers so that they match the eduPostal Contact Record field names – see below. This will expedite your list imports, saving you time.
- First Name
- Last Name
- Address
- Address2
- City
- State/Providence
- Zip/Postal Code
- Country
- Company
- Occupation
- Phone
- Mobile
- Website
Map Any Remaining Required Name & Address Fields
eduPostal makes it abundantly clear exactly which fields you’ll then need to map manually in order to send a direct mail campaign. You won’t be able to proceed until these fields are properly mapped.
- Required fields that are properly mapped will be green.
- Required fields that still need to be mapped will be white, within the red shaded area.
- Optional fields will be yellow.
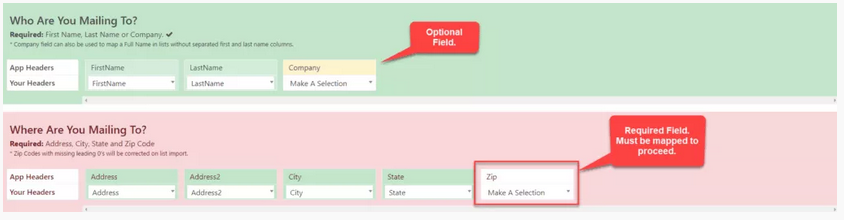
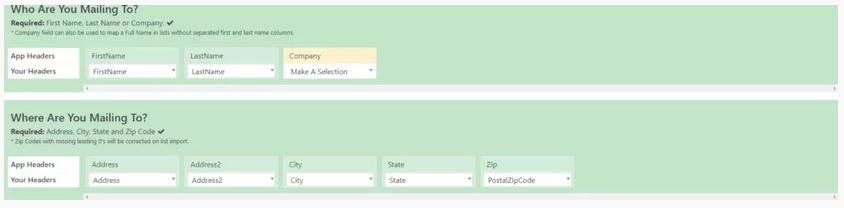
Once the required fields have been properly mapped, the field and shaded area will turn green.
Personalization & Other Common Mappings
You can map other common data fields that are standard in eduPostal such as Email, Phone, Occupation, etc. as well as up to 35 additional User Defined Personalization Fields.
If you don’t want to import any of the Variable Data fields that have been auto-mapped, you can easily clear the fields by clicking the red “Clear Selections” button. Or, you can edit any of the fields by using Cool Tool #1 or Cool Tool #2 outlined below.
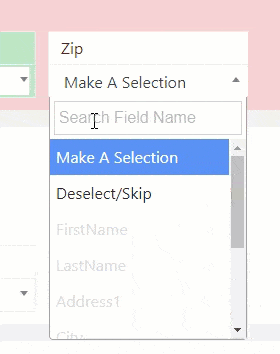
Cool Tool #1: Select & Deselect Fields – Eliminating Room For Error
When you select a field to be mapped, it will be grayed out in the list and no longer available to be selected. Change your mind? Just “Deselect” the field and scroll or search for the field you want to use.
Cool Tool #2: Search For Your Mapping Fields
When mapping any field into eduPostal, you can now just start typing in the search box to quickly navigate to the correct field to map.
Remember, ANY of the fields that you map into eduPostal can be used in the Variable Data and Variable Logic personalization tools in our direct mail editor.
Once your mapping is complete, click Confirm Field Mappings.
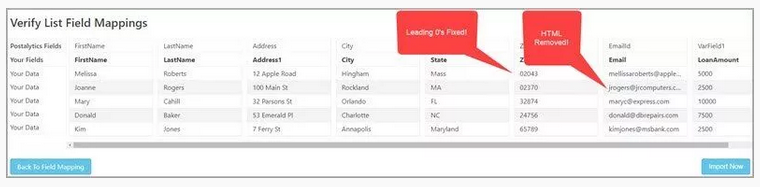
Last – Verify Your Field Mappings
Finally, you’ll get a sneak preview to see what your data will look like once it has been imported. If you want to change anything, you can go back and fix your mappings. If you’re all set, click Import Now.
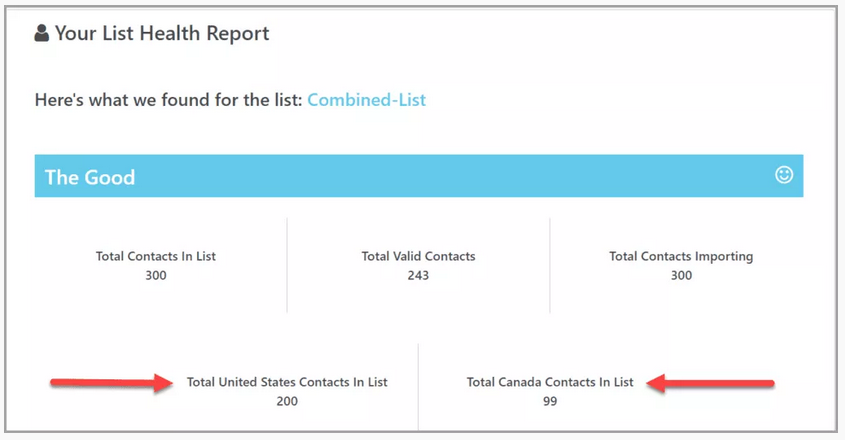
Your List Health Report – Important List Data
While we’re working on importing your list, you’ll see a quick snapshot of the “health” of your list.
We break out the Valid contacts (who we can mail to) from the Invalid contacts (who we set aside with an Invalid status).
You’ll also see if we had to “truncate” any fields because the data in them was too long for the fields that will hold them in eduPostal.

If your list upload contained both US and Canadian addresses, you’ll see the breakdown in the List Health History Report.
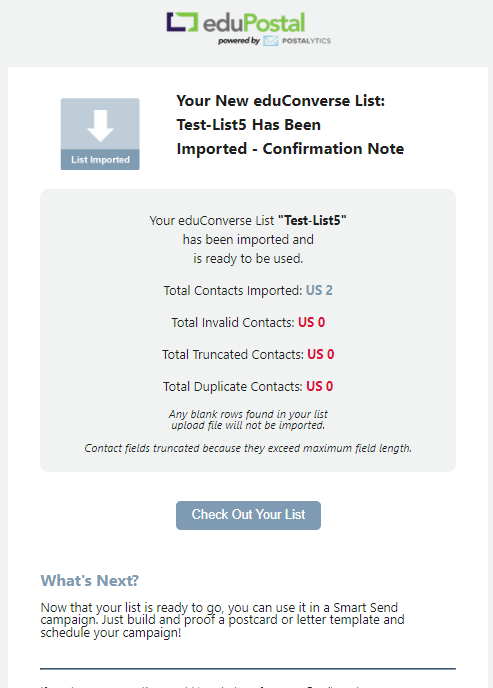
You’ll Get An Email Confirmation
When your list is fully imported and mapped, you’ll get an email confirming that the process is completed. If your list is large, it can take a few minutes. If you had any duplicate records in your list, the email confirmation will include an attached .CSV file with your duplicates listed. We only keep one of the duplicates in your list so you don’t send the same mailer twice to the same contact.
Check Out Your Imported List
When the list import is complete, we recommend checking the list out. You can click the “Go To My Lists” button at the bottom of the List Health Report, or click on “View Lists” on the top menu.
For lists that were uploaded with both US and Canadian addresses, you’ll see the list name as well as list country.
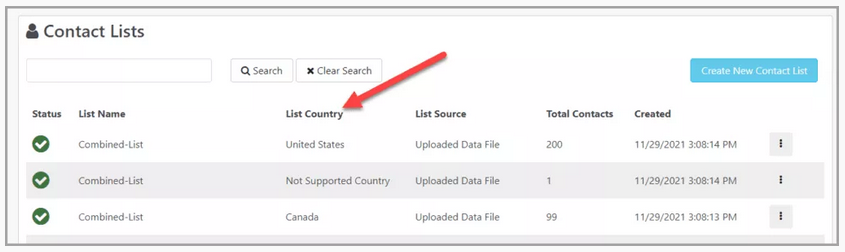
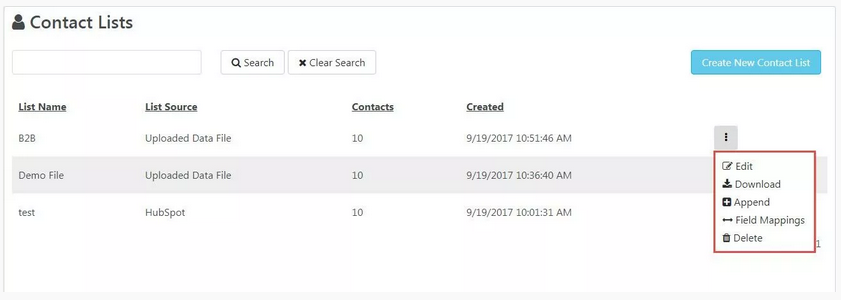
You’ll also see the status of your list, the list source, number of contacts and date your list was created. To manage your newly updated list, click the edit button. From here, you’ll be able to do the following:
- Edit your Contact List
- Download your Contact List
- Append records with the same layout to your list
- Edit Field mappings of the list
- Delete your list
Questions? Thoughts? We’d love to hear from you!